How to Block Ads on Android Using Private DNS
Are you tired of those annoying ads that pop up while you’re browsing or reading articles online? If you’re one of those people looking to put an end to these ads, then this article on Techomatic is perfect for you. Here we’ll show you how to block ads on Android using private DNS.
Ads can really ruin your experience, and some of them can even harm your Android device by draining your battery and invading your privacy. Private DNS is a fantastic solution to block ads on your Android phone, and the best part is you don’t need to root your phone to do it.
Using private DNS to block ads on Android not only eliminates ads but also speeds up website loading and safeguards your device from spyware and harmful websites that often come through ads. There are various DNS servers available to block ads, and this article mentions some of them.
How to Block Ads on Android Using Private DNS
Before you start with the steps, ensure that your Android device is running Android 9 Pie or a newer version. This is important because the Private DNS feature was introduced in Android 9.
To use the private DNS feature to block ads on Android:
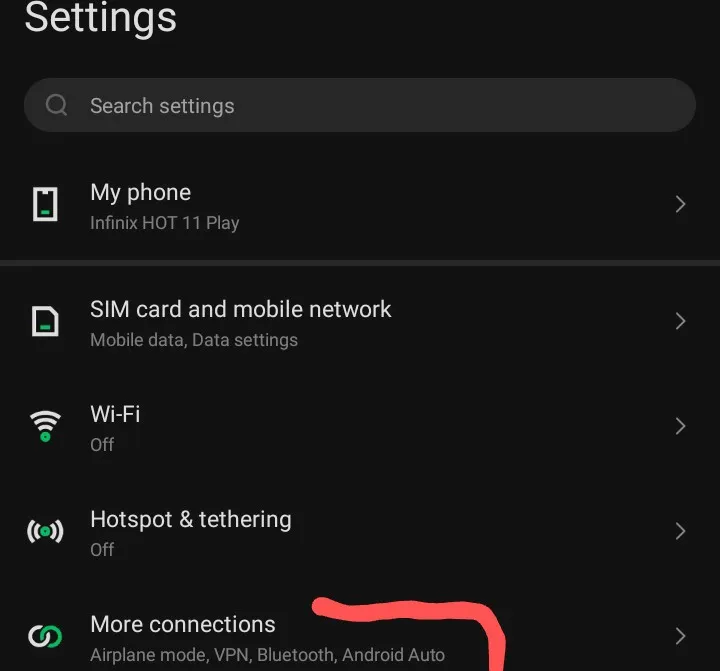
1. Go to your phone’s Settings and look for “More connections” or “Connection & sharing” (the name may vary depending on your phone).

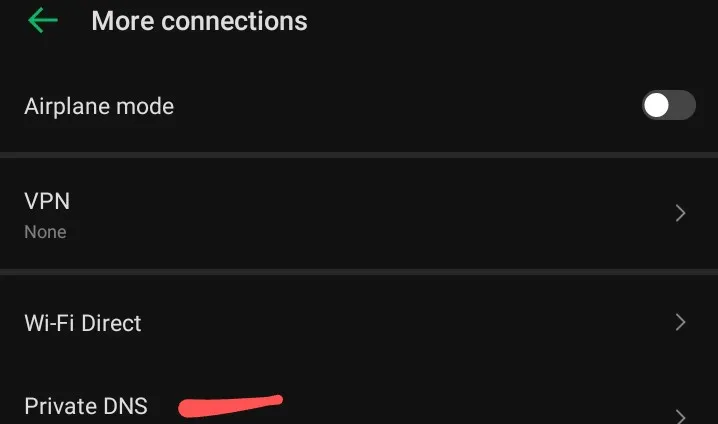
2. Tap on the option called “Private DNS.”

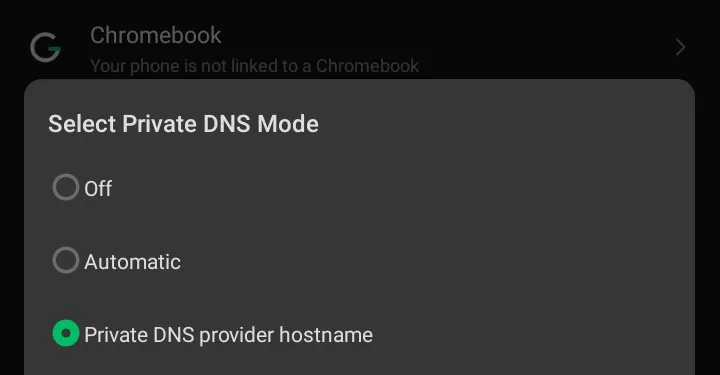
3. Choose “Private DNS provider hostname.”

4. Enter the DNS server address, for example, “p2.freedns.controld.com,” in the hostname section and tap Save.

5. Now, either turn off your internet or Wi-Fi connection or simply restart your device to make the changes take effect. After the restart, open your browser and visit the website where you used to see ads. They should be blocked now.
Best DNS Host to Block Ads on Android
1. Adguard DNS
Adguard DNS is a reliable option to get rid of those pesky ads on your phone. And the best part is you don’t have to mess with your device by rooting it. Plus, it’s completely free to use. If you want extra features, they have a subscription plan available, but the basic ad-blocking is free for Android users.
The awesome thing is, you don’t need to install any software. AdGuard DNS works by using a DNS address to block those pesky ads, and it even stops harmful websites that could hurt your device with phishing, malware, or other bad stuff. You can use this DNS address to block ads on Android device belonging to you (dns.adguard.com).
2. Control D
Control D is another handy DNS server that’s here to save you from ads, unwanted stuff, and malware. The best part? No need to clutter your device with extra apps, and it won’t cost you a dime.
You can use it to block websites you’d rather not visit, like those showing adult content or gambling. Just head to the Private DNS section in your phone settings, type in the Control D server address (p2.freedns.controld.com), and voilà – you’ll be enjoying a safe and ad-free browsing experience.
3. NextDNS
Consider trying out NextDNS (dns.nextdns.io) as another alternative – it’s free and safe for everyone. There’s no need to add any extra apps. What it does is keep your device protected from various online dangers like phishing, malware, and other bad stuff. Setting it up is simple.
You can configure NextDNS with your device’s network to shield yourself from unwanted ads. Even better, you can set up NextDNS at the router level, which means every device connected to your network will automatically use NextDNS. If you want to get rid of ads on multiple devices, this is the best way to go.
4. LibreDNS
LibreDNS is another choice for stopping ads on your Android gadget. It’s not just about ad-blocking; it also assists in bypassing censorship and protects against risky domains that could harm your device.
In addition to blocking ads, it adds an extra layer of security against online threats. Using LibreDNS is also straightforward. Simply follow the same steps and write out LibreDNS server address (noads.libredns.gr), and you’re all set to go. It’s a hassle-free way to keep ads at bay and stay safe online.
Conclusion
These are some of the most effective options to block ads on Android device using Private DNS. So, if you’re looking for a cleaner and more enjoyable online experience without the hassle of ads, follow our guide on setting up Private DNS and enjoy ad-free browsing on your Android device.
